In this tutorial, I am going to show you how to set up Laravel Passport.
I believe that this package is easy enough to learn and use already, but I want to share the exact way I go about starting a project that needs to have an API.
Terminal
First of all, we create a Laravel application from scratch using the famous command:
laravel new passport-authentication
We need to go inside the project folder passport-authentication to install laravel/passport package with the following command:
composer require laravel/passport
To complete the installation, we need to create a few tables in our database. Since the package service provider registers its database migrations, all we need to do at this point is to run the command:
php artisan migrate
The command below will create the encryption keys needed to generate secure access tokens. This command will also create "personal access" and "password grant" clients, which will be used to generate access tokens:
php artisan passport:install
Set up
The HasApiTokens trait is now available, which we will assign to our User model. This trait will provide helper methods to our model, which allows us to inspect the authenticated user's token and scopes.
<?php

namespace App;

use Laravel\Passport\HasApiTokens;
use Illuminate\Notifications\Notifiable;
use Illuminate\Foundation\Auth\User as Authenticatable;

class User extends Authenticatable
{
    use HasApiTokens, Notifiable;
}
Our next step is to call the Passport::routes() method within the boot method of our AuthServiceProvider. This method will register the routes necessary to issue access tokens and revoke access tokens, clients, and personal access tokens:
<?php

namespace App\Providers;

use Laravel\Passport\Passport;
use Illuminate\Support\Facades\Gate;
use Illuminate\Foundation\Support\Providers\AuthServiceProvider as ServiceProvider;

class AuthServiceProvider extends ServiceProvider
{
    /**
     * The policy mappings for the application.
     *
     * @var array
     */
    protected $policies = [
        // 'App\Model' => 'App\Policies\ModelPolicy',
    ];

    /**
     * Register any authentication / authorization services.
     *
     * @return void
     */
    public function boot()
    {
        $this->registerPolicies();

        Passport::routes();
    }
}
By default, Passport issues long-lived access tokens that expire after one year. If you would like to configure a longer/shorter token lifetime, we may use the tokensExpireIn, refreshTokensExpireIn, and personalAccessTokensExpireIn methods. We should call these methods from the boot method of your AuthServiceProvider:
/**
 * Register any authentication/authorization services.
 *
 * @return void
 */
public function boot()
{
    $this->registerPolicies();

    Passport::routes();

    Passport::tokensExpireIn(now()->addDays(1));

    Passport::refreshTokensExpireIn(now()->addDays(1));

    Passport::personalAccessTokensExpireIn(now()->addMonths(1));
}
Finally, in our config/auth.php configuration file, we set the driver option of the api authentication guard to passport. This will instruct our application to use the Passport's TokenGuard when authenticating incoming API requests:
'guards' => [
    'web' => [
        'driver' => 'session',
        'provider' => 'users',
    ],

    'api' => [
        'driver' => 'passport',
        'provider' => 'users',
    ],
],
Controllers
To follow good practice, we create Controllers to manage our logic. I prefer to have API controllers in the Http\Controllers\API\v1 folder.
php artisan make:controller API/v1/AuthController
php artisan make:controller API/v1/MeController
We can delete the Auth folder inside Http as we are not going to use it.
# Linux systems
rm -r app/Http/Controllers/Auth
Form Requests
I see many developers still using Validation inside the controller, but I am not a fan of that. I like my code clean and organised, so I generate form requests using the following commands:
php artisan make:request RegisterUser
php artisan make:request LoginUser
Adjust the FormRequest classes as per your needs
<?php

namespace App\Http\Requests;

use Illuminate\Foundation\Http\FormRequest;

class RegisterUser extends FormRequest
{
    /**
     * Determine if the user is authorized to make this request.
     *
     * @return bool
     */
    public function authorize()
    {
        return true;
    }

    /**
     * Get the validation rules that apply to the request.
     *
     * @return array
     */
    public function rules()
    {
        return [
            'name'     => 'required|max:255',
            'email'    => 'required|email|max:255|unique:users',
            'password' => 'required|min:8|max:60|confirmed'
        ];
    }
}
<?php

namespace App\Http\Requests;

use Illuminate\Foundation\Http\FormRequest;

class LoginUser extends FormRequest
{
    /**
     * Determine if the user is authorized to make this request.
     *
     * @return bool
     */
    public function authorize()
    {
        return true;
    }

    /**
     * Get the validation rules that apply to the request.
     *
     * @return array
     */
    public function rules()
    {
        return [
            'email' => 'required|email|max:255',
            'password' => 'required|min:8'
        ];
    }
}
Adding a Custom Middleware
Since Laravel's middleware RedirectIfAuthenticated redirects users to the homepage, we want to create a custom middleware instead by returning a json response.
We generate our middleware with the following command:
php artisan make:middleware NotAuthorizedIfAuthenticated
Our custom middleware will contain the following code:
<?php

namespace App\Http\Middleware;

use Closure;
use Illuminate\Support\Facades\Auth;

class NotAuthorizedIfAuthenticated
{
    /**
     * Handle an incoming request.
     *
     * @param \Illuminate\Http\Request $request
     * @param \Closure $next
     * @return mixed
     */
    public function handle($request, Closure $next, $guard = null)
    {
        if (Auth::guard($guard)->check()) {
            return response()->json([
                'status' => 'fail',
                'data'   => [
                    'title' => __('auth.not_authorized')
                ]
            ]);
        }

        return $next($request);
    }
}
Notice that the localization key auth.not_authorized is a custom one. To fix this, add the following code in your auth.php localization file array:
'not_authorized' => 'You are not authorized to perform this API request.'
To register our middleware, we need to list the middleware class in the $middleware property of your app/Http/Kernel.php class:
...
'auth.guest' => \App\Http\Middleware\NotAuthorizedIfAuthenticated::class,
...
Routes
We can't forget to create our routes, so let's populate our routes/api.php file with the following code:
Route::prefix('v1')->namespace('API\v1')->group(function () {
    Route::prefix('auth')->middleware('auth.guest:api')->group(function () {
        Route::post('login', 'AuthController@login');
        Route::post('register', 'AuthController@register');
    });

    Route::middleware('auth:api')->group(function () {
        Route::prefix('me')->group(function () {
            Route::get('info', 'MeController@info');
        });
    });
});
AuthController
The AuthController will contain the register and login functions.
The register function will create the user, and generate the access token returning it as a json response.
The login function will check if the credentials are correct, then it will create the user access token.
<?php

namespace App\Http\Controllers\API\v1;

use App\Http\Controllers\Controller;
use App\Http\Requests\LoginUser;
use App\Http\Requests\RegisterUser;
use App\User;
use Illuminate\Support\Facades\Auth;

class AuthController extends Controller
{
    /** @var User */
    private $user;

    public function register(RegisterUser $request)
    {
        $this->user = User::create([
            'name'     => $request->name,
            'email'    => $request->email,
            'password' => bcrypt($request->password)
        ]);

        return $this->createUserAccessTokenResponse();
    }

    public function login(LoginUser $request)
    {
        if (Auth::attempt($request->validated())) {
            $this->user = Auth::user();

            return $this->createUserAccessTokenResponse();
        } else {
            return response()->json([
                'status' => 'fail',
                'data'   => [
                    'title' => __('auth.failed')
                ]
            ]);
        }
    }

    private function createUserAccessTokenResponse()
    {
        return response()->json([
            'status' => 'success',
            'data'   => [
                'token' => $this->user->createToken('ServiceOnDesk')->accessToken
            ]
        ]);
    }
}
Testing
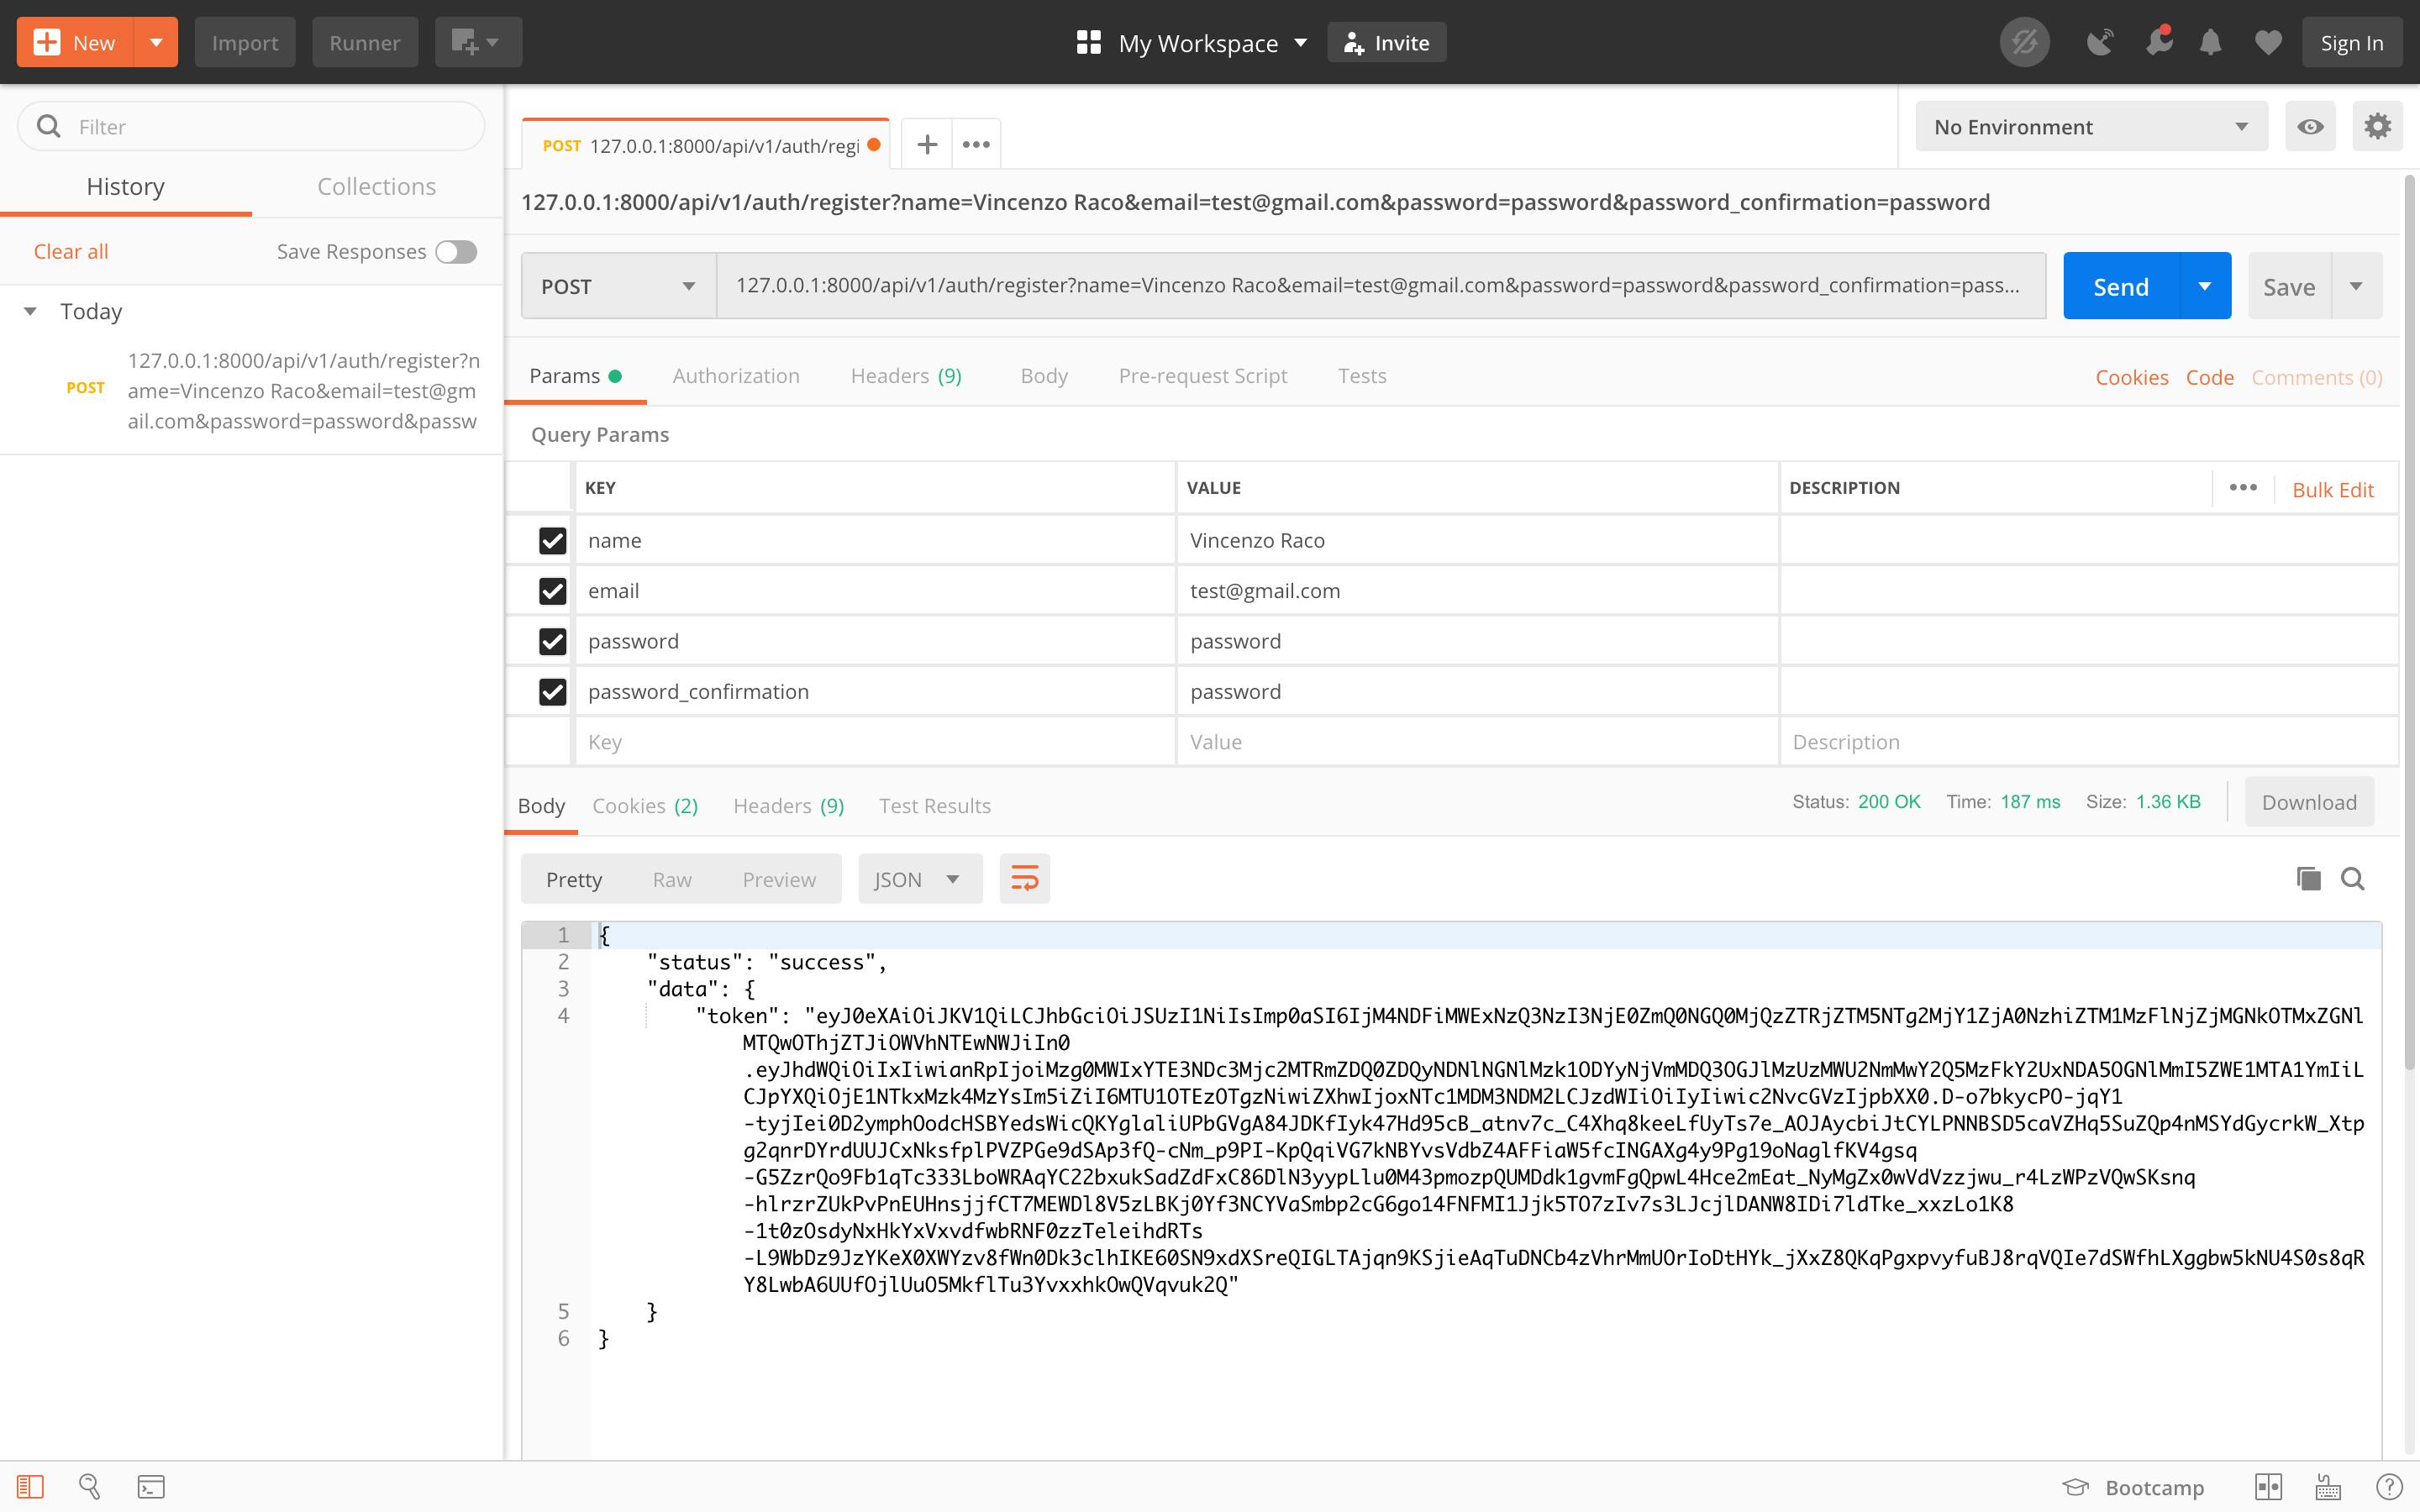
We start our server using php artisan serve then we call our registration using the URL 127.0.0.1:8000/api/v1/auth/register.
Don't forget to set the headers like the following picture:

We now create a new POST request and fill the params name, email, password and password_confirmation.

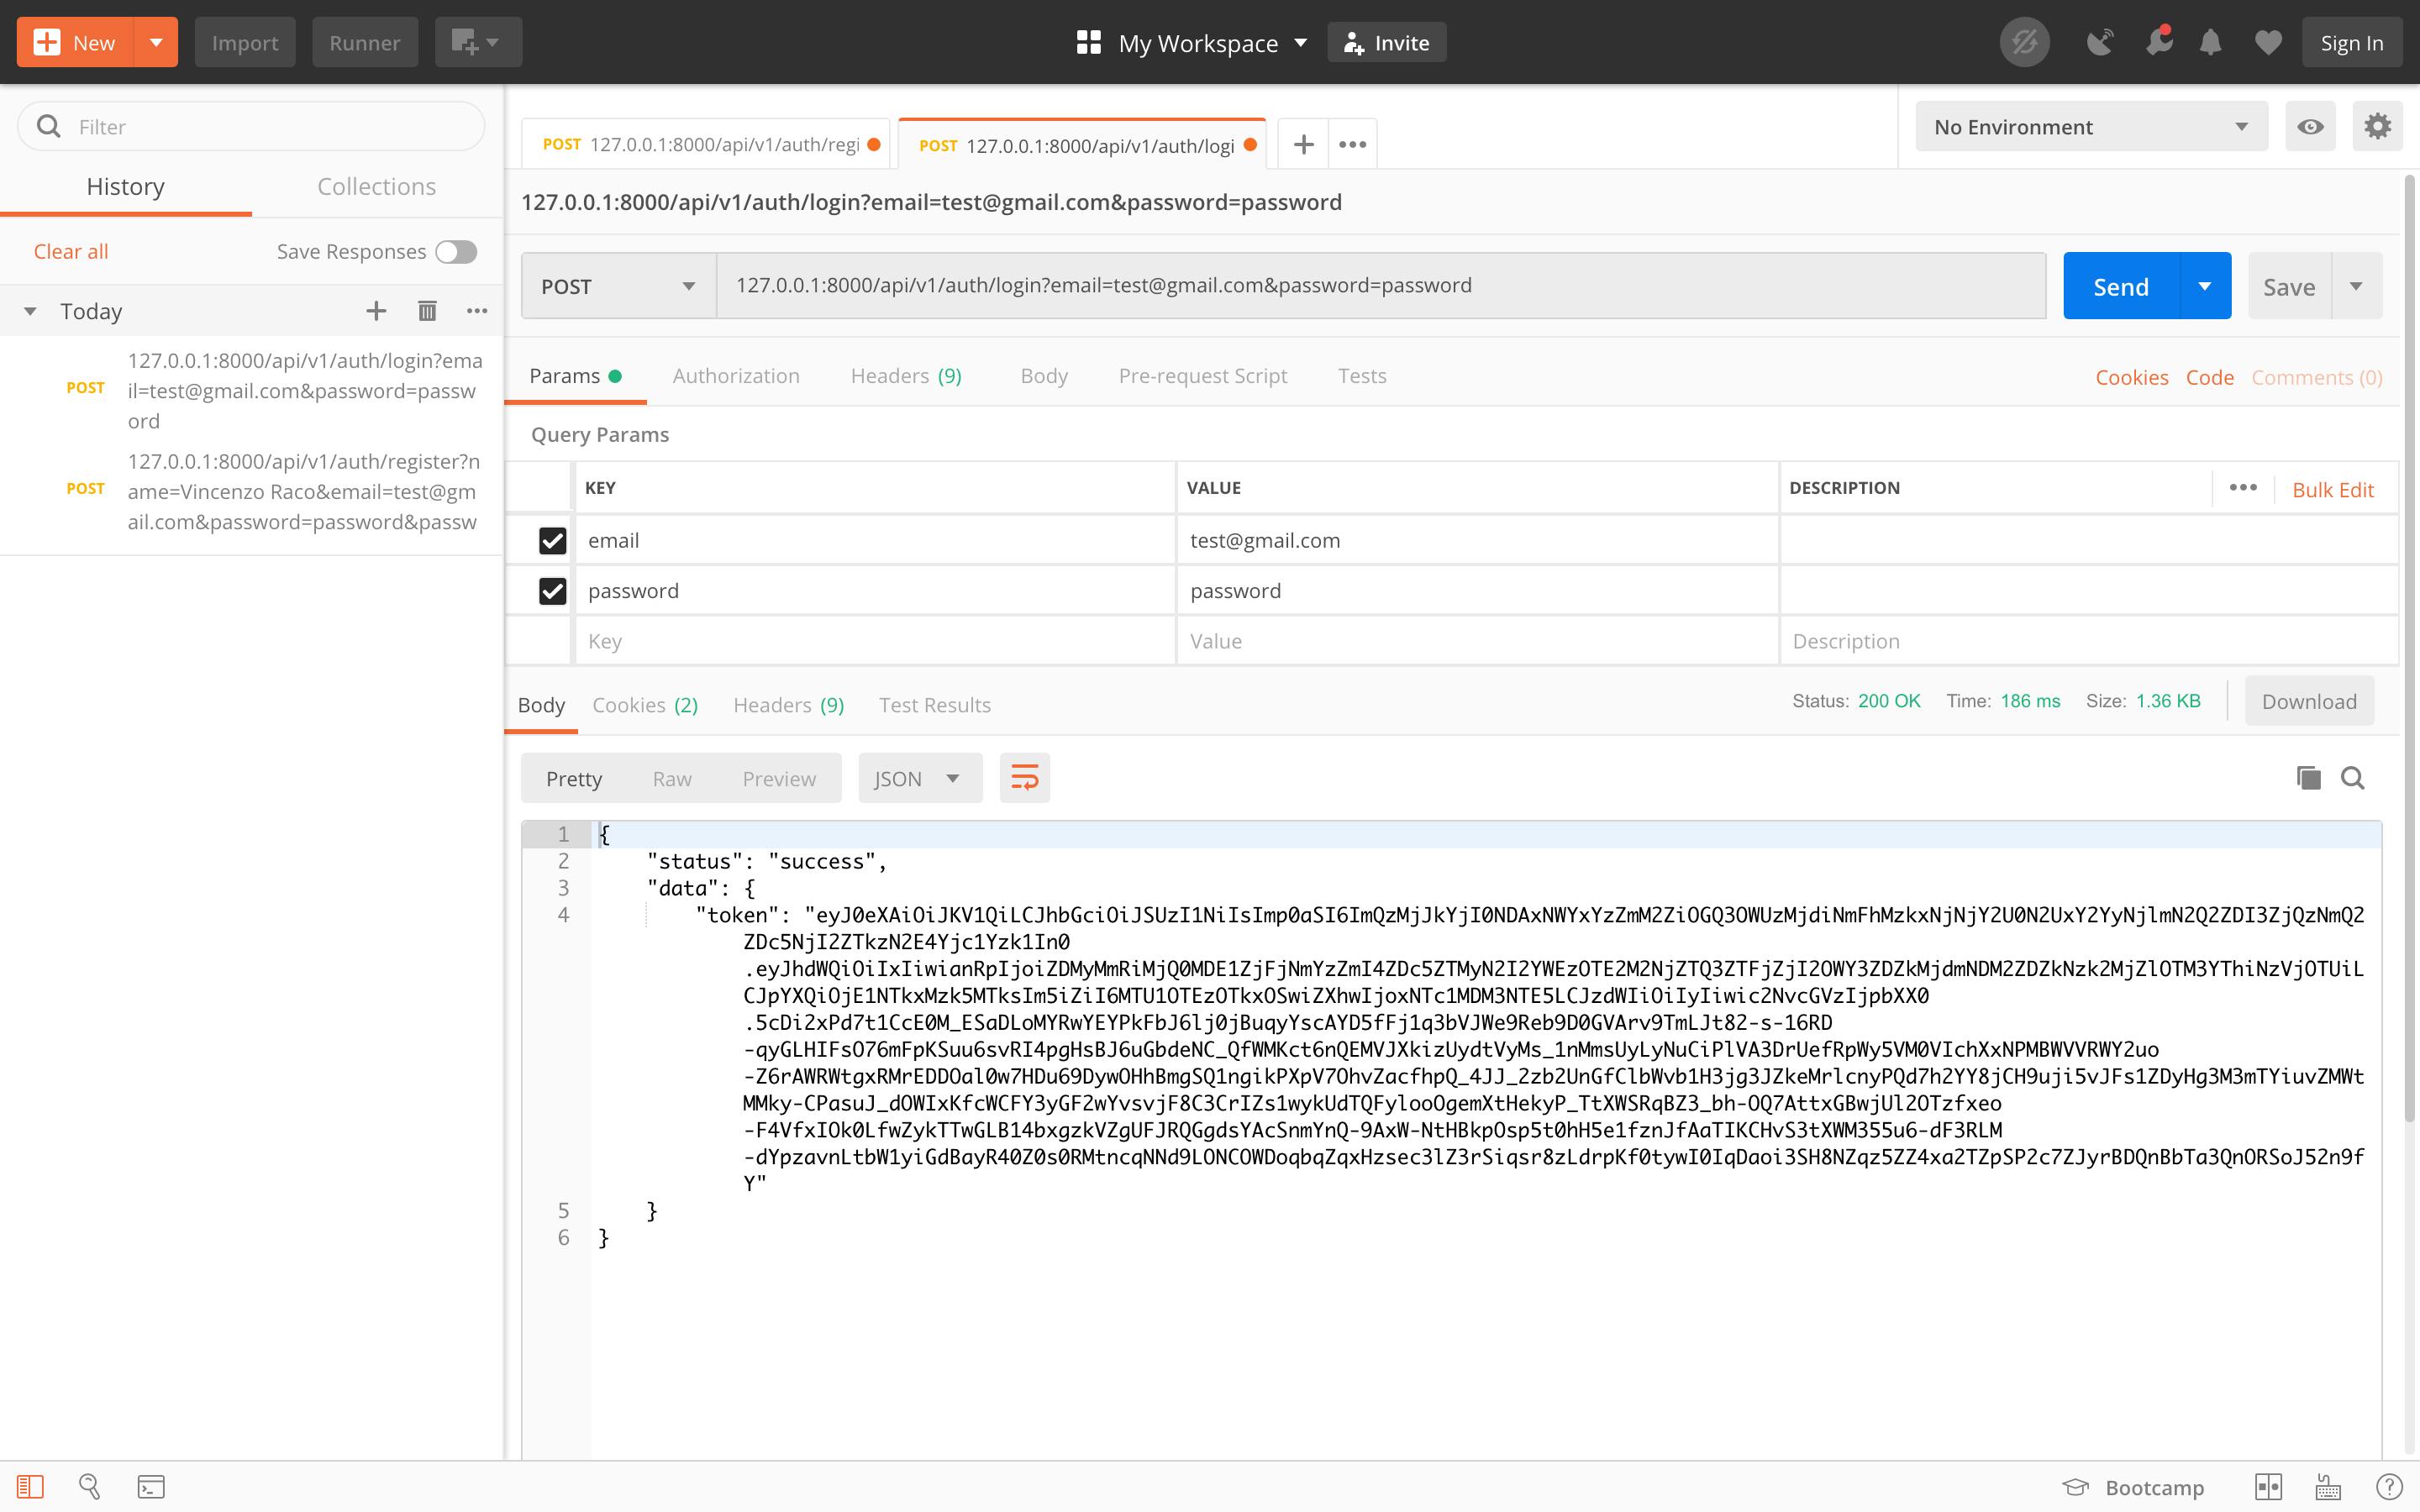
We should get a response with the Bearer token that we can use to access our protected routes. But first, let's test the login route as well using the URL 127.0.0.1:8000/api/v1/auth/login

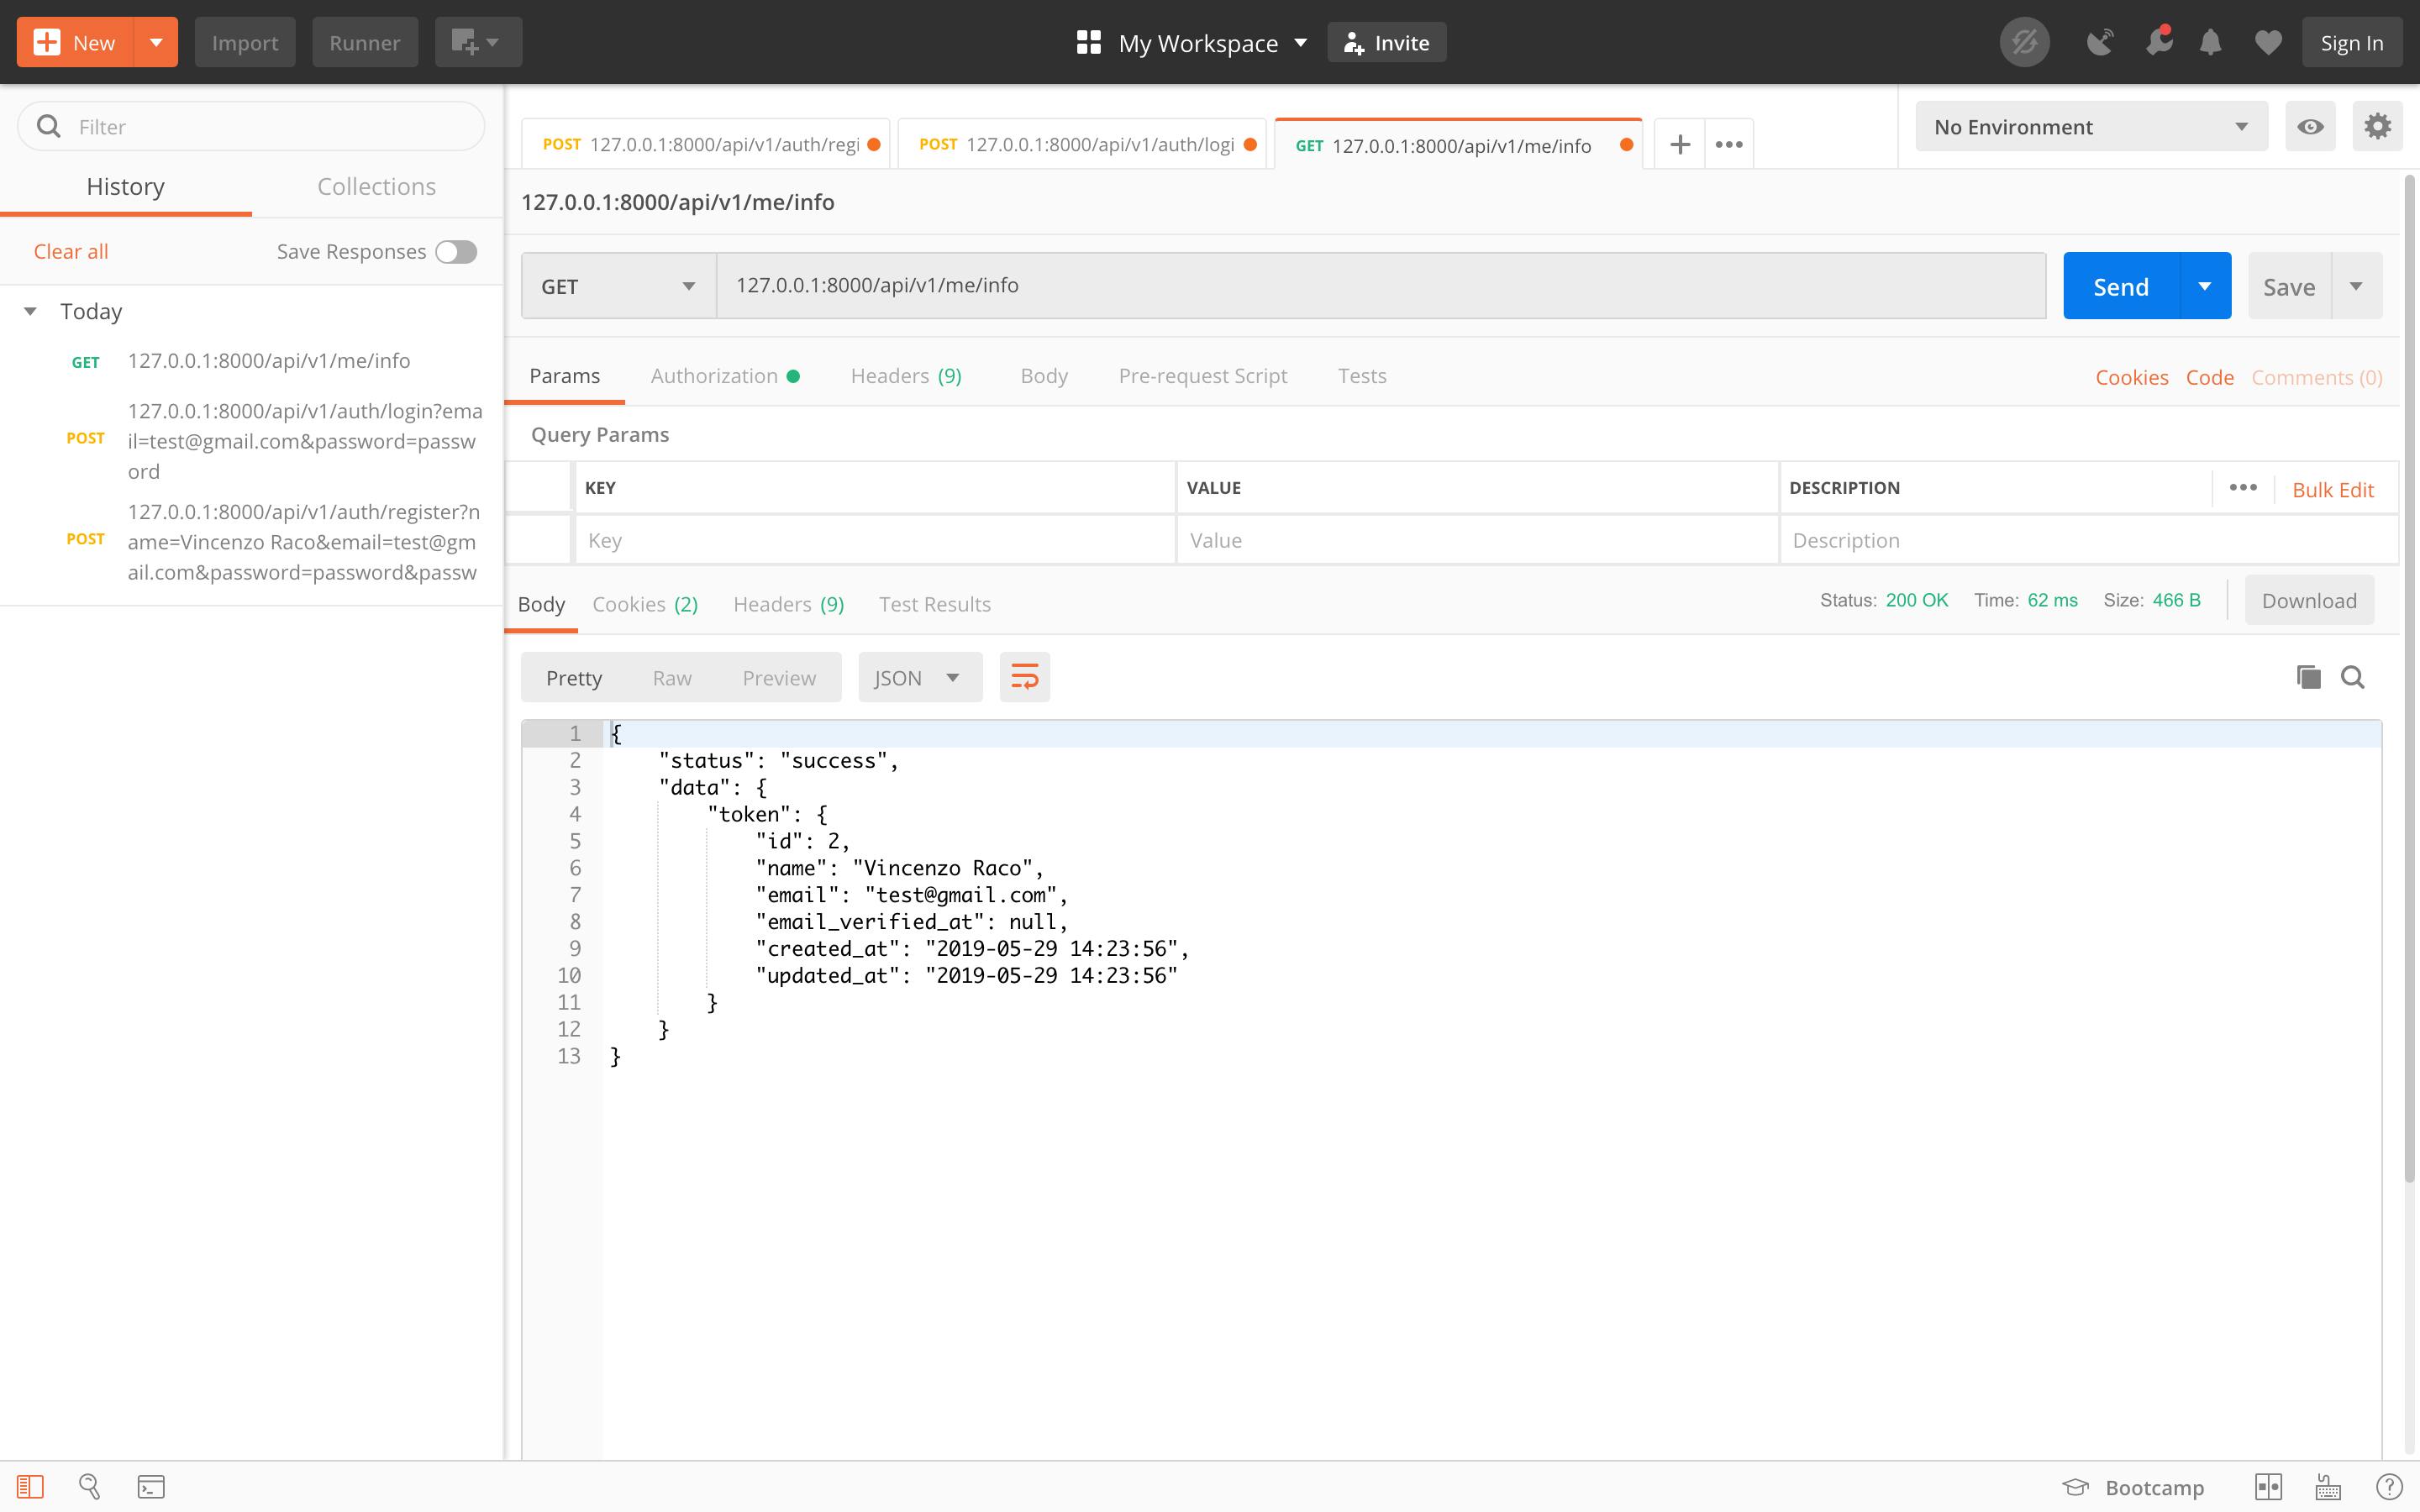
To test the token, we copy it and open a new request tab as GET. Once we create the new tab, set the URL as 127.0.0.1:8000/api/v1/me/info and then we enter the token in the Authorization section, selecting Bearer Token as the type.

Now submit the request by clicking Send, and we should receive the data below:

And now we are done!
If you have any questions, please leave a comment below.